

How To Set Up A Smeltery In Tinkers Construct
watch 01:25
Jurassic World: Rule Dominates Fandom Wikis - The Loop
| Smeltery | |
|---|---|
 | |
| Biomes | Whatever |
| Type | Multiblock |
| Size | 5x5 |
| Added Past | Tinkers' Construct |
The Smeltery is a multi-block structure in the Tinkers' Construct modern that melts Ore, Gravel Ore, Oreberry, Ingots, Metallic and Alloy Blocks, and Obsidian into liquids that can so be poured into casts.
Utilize [ ]
The Smeltery is used to melt down ores and metals to exist used in casting or creating Alloys. When smelting raw ore, 2 ingots will be produced from the ore, while a typical furnace would only yield i.
- Steps
- Make full the Seared Tank with buckets of lava. Each tank holds up to iv.
- Put ores/ingots/blocks of the material in the Smeltery Controller (correct-click controller to open GUI).
- Let the Smeltery melt the material, this volition take different lengths of time depending on material.
- Empty the liquid metallic into a Casting Tabular array or Casting Basin by right-clicking on the faucet. This requires a Seared Faucet to be properly placed on the Smeltery Bleed.
- Let it cool.
You cannot add material to the Smeltery by manually placing it in the space. All materials must exist added using the Smeltery Controller.
Materials [ ]
These are the materials that can exist smelted using a Smeltery. These materials tin can only be used with the smeltery and cannot be used in a Part Builder.
- Iron
- Cobalt
- Ardite
- Manyullyn
- Copper
- Bronze
- Alumite
- Steel
- Obsidian (to make parts and blocks merely)
Automation [ ]
- With a Hopper and a Chest, you lot tin also automaticallyfeed insmeltable avails and materials into the Smeltery Controller. Just make certain to place the hopper while shift clicking one side of the smeltery controller. This is extremely useful when smelting vast amounts of Materials
- A way to automate the smeltery is to have a redstone point to the faucet constantly pulsing, causing it to pour. Having a hopper under the casting table (which preferably would have an ingot mold), would take the ingots/tool heads, etc. out of the casting table, and could either be feeding into a chest directly or lead to a chain of other hoppers.
- Some other way is to place a Redstone comparator next to a hopper underneath the casting basin or table. and so that the two-torch side is against the hopper. It will put out a very pocket-sized pulse when an particular goes through the hopper, which by using a repeater tin be wired up to the faucet and perpetuate the procedure. This does not always seem to work smoothly and may accept some piece of work to perfect. The benefit is that information technology creates much less lag than a redstone clock has the potential to.(This demonstrates how to build an automatic smeltery, but the wireless setup shown uses items from a Tinker's Construct plugin not included in the Hexxit modpack.)

The Smeltery and You Automation

Structure Guide [ ]
Assembling the smeltery is as easy as following the Mighty Smelting book y'all are automatically given by the game once you lot make all of the Smeltery parts. It will tell you the exact quantities of the items needed to complete a working, basic smeltery. The instructions to create the Smeltery parts are located in the copy of Materials and You (volume 1) that yous get at the beginning of the game when y'all spawn. Generally, you want to have several layers for maximum efficiency, as it would be a deadening and tedious procedure of continuously adding nine ore to the smelter, 4 to five is optimum.
Smeltery construction is easy. Information technology's just a floor and four walls. As an analogy, imagine constructing a building. You lot must start with a footing level, then you add a first wall layer, and a 2d wall layer. The smeltery is no different, except there are 4 requirements.
Smeltery Requirements [ ]
- There must be a 3x3 area of Seared Bricks acting as the base flooring. This space must forever remain open up for the Smeltery to function properly. Don't place nor break any blocks from this 3x3 area.
- There must be a Seared Tank in the wall.
- There must also be a Smeltery Controller in the wall.
- You must have a Smeltery Drain attached (with a Seared Faucet, and something for information technology to drain into) if y'all intend to always excerpt the molten ore from the Smeltery.
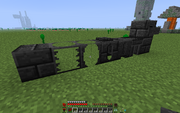
All bricks used in the smeltery. Please notation that the Smeltery Drain has its faucet attached, though there'southward no casting tabular array or casting basin below the faucet.
Other than the few required bricks, you may utilize any combination of other bricks to fill out the infinite. Pictured are the bricks used in Smeltery structure. On the left, the Seared Bricks (which make up the 3x3 flooring of the Smeltery). Immediately later that are the Seared Glass and Seared Window blocks, the Seared Tank (required for Smeltery structure), the Casting Bowl, a Casting Table, and a Smeltery Drain with Seared Faucet sitting atop some other Seared Bricks block.
It is of import to note that one time you add together basins and the outer walls, the footprint of the Smeltery tin be equally much as 7x7. What's important is that the core 3x3 infinite remain open up, and the floor of that space is Seared Brick blocks.
If you need a more descriptive guide, looking up smeltery construction videos in YouTube is a decent culling.
In that location are iv steps in structure. "Roll upward them sleeves" and get started!
Construction Steps [ ]
 | This department is demand of a clean-upwardly. You can help out Hexxit Wiki by re-organizing parts of the section, checking grammar and spelling, and doing other helpful things to correct this section. |
Pace 1. Identify the 3x3 ground layer of Seared Bricks. This is the kickoff layer. It's easiest to just sink this into the ground then that it's flat with the surface around it. The rest of the Smeltery will be built above this betoken.
")
Step 1:The dirt blocks are shown as reference for the size of the 3x3 base of Seared Bricks
Footstep 2. Place the second layer. Notation that the bricks for the outer wall sit Outside of the 3x3 Seared Bricks floor. Two pictures provided to testify progress of the build. End the 2nd layer by placing a Smeltery Controller and a Seared Tank . I does non matter where in the outer wall y'all place these items; they simply must be present. You lot will know if you have completed this correctly if the Smeltery Controller begins to show a Furnace-fire particle.
")
Step ii Part 1: Construction of the second layer halfway complete. Note that the 3x3 Seared Bricks floor is still completely open - it must remain this style.
")
Step two Part 2: The 2d layer of the Smeltery is completed. Note that the Smeltery Controller is burning and the 3x3 infinite in the heart remains intact.
Step 3. Build the third layer. You may utilize any combination of bricks to practise this, just you must include a Smeltery Drain (and Seared Faucet and Casting Table or Casting Basin) so you can draw the molten metal out of the Smeltery.
")
Stride three: A by and large completed Smeltery blueprint using mostly Seared Windows. The Smeltery Drain is missing a Seared Faucet and Casting Tabular array or Casting Bowl.
Footstep 4. Add lava to the Seared Tank by right-clicking the tank with a Lava Bucket. The tank tin hold four buckets worth of lava(4000mb).
")
Step 4: Get 'er fueled upwards with lava!
Done! That'due south it. Add every bit many drains as you like, or brand the walls entirely out of Seared Window or Seared Glass blocks (making certain that the 2nd layer contains the Seared Tank and the Smeltery Controller!) if it suits your fancy. You lot tin can also make the Smeltery as alpine as you'd like, and having a taller Smeltery will permit you to smelt more metal at once. Just don't fill up in that 3x3 space in the middle!
Happy Smelting!
Notes [ ]
- Make sure to empty your Smeltery after every use completely, because modest amounts of previously smelted materials tin can cake your casting tables or casting basins. The pocket-sized quantities of molten material will pour into containers and leave them partially full, unable to be interacted with. To resolve this, either pause the casting table/bowl or smelt and pour in more of the material you lot are stuck to top off the cloth.
- Materials that do not combine to make an alloy tin can be smelted whilst some other previously smelted material is still in the smeltery. The materials will be drained off from the bottom of the smeltery get-go (i.east. in the order in which they were smelted). For example, if in that location is liquid iron in the smeltery, melting down aluminium volition result in two layers of liquid metal.
- Standing inside the smeltery is not recommended - information technology will harm one point every 5 seconds, and it damages armors, simply doing so will cause your tank to fill with blood.
- Seared tanks can each hold up to four buckets of lava
- If a Villager falls into a smeltery, it volition add a layer of Liquified Emerald in the smeltery; this makes villager farms much more than useful in Hexxit.
- Each tick of harm the Villager takes whilst in the smeltery results in ane nugget of Liquified Emerald
- Smelteries tin naturally spawn in villages increasing the gamble of a Villager falling into it.
Gallery [ ]
Some alternating step images and configurations to testify Smeltery options.
")
An alternating Smeltery configuration. The Lava Tank is in the dorsum.
")
")
These ores were added to the Smeltery via the Smeltery Controller. These cannot exist removed with a choice or past manus or by any other means except the Controller.
Video Gallery [ ]
")
Hexxit Beginner's Guide to Smeltery!
 (22 KB)")
Hexxit Smeltery Guide 2 (Intermediate)
")
Minecraft Tutorials - Tinkers Construct - Smeltery
Source: https://hexxit.fandom.com/wiki/Smeltery
0 Response to "How To Set Up A Smeltery In Tinkers Construct"
Post a Comment